How to Read best Hummingbird Sonar Fish Finder | River Country Outdoor
Are you Need fishfinder devices? If you want to buy fishing tools let me know what kind of fishing tolls you want. Now we talking about fish finder the most important tool.
The first best fish finder (Hummingbird fish finders) was produced as a trademark of Fulton Electronics in the 1970s. Over the years, Hummingbird has produced several sonar and fish detection devices. These function by sending sonar signals in the water and interpreting the "reflections" of the signal. Today, Hummingbird offers several different models of full-color sonar units that make the direct and direct location of fish. All these units present the information in a rather standard way, allowing fishermen to read important data at a glance.
Instructions :
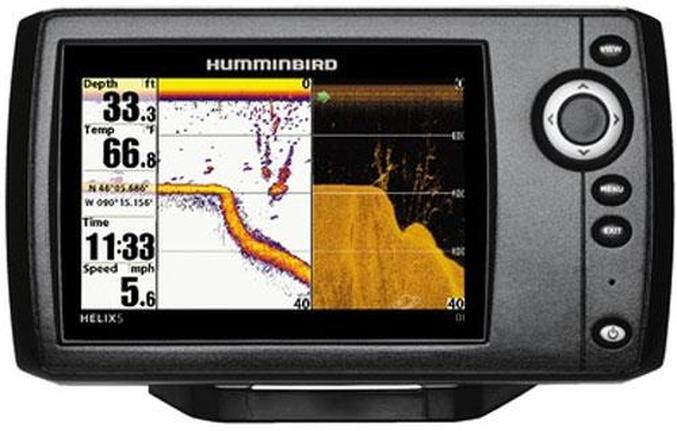
Monitor vital information about the boat and the water by watching the black numbers. 1 Monitor vital information about the ship and water by looking at black numbers. The depth of the water is displayed on the upper left of the Hummingbird sonar screen, this is determined by the time a sonar pulse takes to reflect on the bottom of the lake and return to the unit. Watch for a drastic drop in depth, which can indicate a sandbar or low bottom and make the boat run aground.
Check the temperature of the water by looking at the numbers listed below the depth on the left side of the screen. 2 Check the water temperature by looking at the numbers below the depth on the left side of the screen. Temperature can be useful in deciding what type of fish will be active. Since fish are cold-blooded, they usually have a higher activity and are more likely to attack a lure during warmer temperatures.
Track the speed of the boat and the voltage of the Hummingbird unit on the bottom of the display. 3 Track the speed of the boat and the voltage of the Hummingbird unit at the bottom of the screen. The speed, expressed in miles per hour, is displayed at the bottom left of the screen. Some fish move fast while others are slow; Use the speed indicator to adjust the boat's movement when dragging.
Watch the voltage indicator on the bottom right side of the screen to make sure the Hummingbird sonar is not overly draining the boat's battery. 4 See the voltage indicator on the bottom right of the screen to ensure that the Hummingbird sonar is not draining the boat's battery excessively. Under optimum conditions, the voltage must be above 12 volts. If it falls below this point, the use of the sonar must be interrupted to preserve the function of the trawl engines, navigation lights and starter motors in the boat.
Follow the contour of the lake bed by watching the movement of the real-time sonar readout, which is indicated in bright colors along the bottom of the Hummingbird's screen. 5 Follow the contour of the lake bed observing the movement of the real-time sonar reading, which is indicated in bright colors along the bottom of the hummingbird screen. This color band shows the real-time signals that are received from the sonar signal. The closer the color band is to the top of the, the more superficial the screen probe signal. This indication can be useful for checking slopes, ledges, and on what outstanding fish skin.
Watch for condensed "blips" of the sonar readout. 6 condensate clock "blips" of sonar reading. These often show structures, such as submerged trunks or man-made objects, which reflect the sonar signals. Like natural contours, these often hide fish banks.
Find large concentrations of fish by keeping an eye out for the fish icons or "arch" symbols. Find 7 large concentrations of fish, keeping an eye out for fish icons or "bow" symbols. These appear on the screen when a probe signal is interpreted by the unit as a fish. A larger icon will indicate a larger fish.
Target schools of fish based on their depth. 8 Selected schools of fish depending on their depth. This is shown on the feet as a black number next to each fish icon. Adjust the amount of fishing thread in the water to move bait and lures close to this dept.
How to choose the place to fish
Fishing is, for many, a relaxing activity that helps to eliminate stress while in the middle of nature, although, in order to go fishing, you have to know where to go before. That's why, at Fishing Expert we explain how to choose the place to fish so you can have fun as the most.
Instructions:
1. Check before leaving the time that you will face in the area that you want to go fishing, since it will not only affect the condition of the fish but also mark the material that you must carry with you.
2. Look for a secluded place that is far from the noise of civilization. For example, avoid places in rivers that are close to picnic areas and recreation areas because there will be a lot of noise and the fish will be more alert.
3. In case you are interested in fishing for shore, you should prefer a place with calm or regular waves, as the strong waves can make fishing more difficult, and the exit zone like for example the mouths of the rivers, since they present Greater variety of fish.
4. Look also at birds: if you see a greater concentration of seagulls and similar birds flying over an area, it is very likely that there are a good amount of fish there.
5. In the case of river fishing, we must look for live and foamy currents and prefer the deep sites.
6. Always check the websites of fishermen's associations in the area and follow their recommendations. They are the ones who know best how to choose a place to fish in the place you want. In addition, they often publish complete maps on fishing zones.
7. Also do not forget to take a look at the schedules of fishing hooks before leaving home. The different autonomies regulate sizes, periods and types of fishing.
8. You can get a mobile app that will help you know where you have gone fishing and the results you have obtained, such as Fishing Diary or Fishing Day, which will help you choose the best place to fish in the Based on your experiences.
9. If you want to read more articles similar to How to choose the place to fish, we recommend you to enter our category of Recreational activities.
How to Use Lowrance Depth Probes| River Country Outdoors
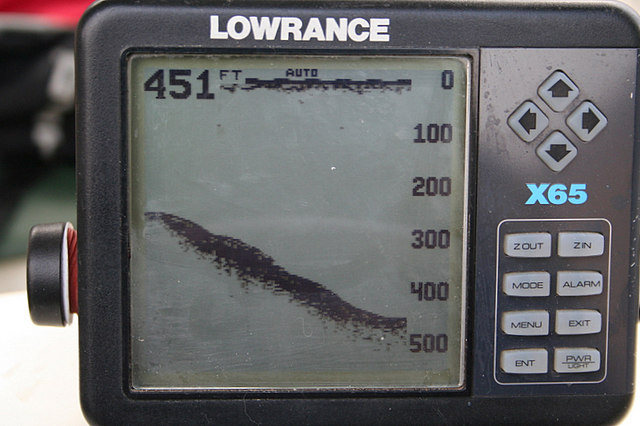
Lowrance is the heart and soul of a recording sounder, an oceanographic instrument that, when used aboard a research vessel, has many of the characteristics of a fish finder. It has an additional feature that is not found in fish finders: as it passes through the sea floor, it records the depth and makes a high resolution drawing of the background on a rotating disk. The disk allows oceanographers to determine the composition of the seabed and even find wrecks.
Instructions
1 Load the paper registration disk inside the axis, adjust the pen to the paper disc and turn the "On / Off" button to the right to turn on the unit and increase the sensitivity of the signal and the screen. Turn the knob counterclockwise to turn it off or decrease the sensitivity of the signal that appears on the unit's display. The greater the sensitivity, the greater the depth of the image, but with a loss of discrimination between large, small and weak objects.
2 Turn the sensitivity knob so that the bottom always shows a bright "signal strength" light on the dial, regardless of water depth. Some types of seabed may show brighter or wider signals than others, but if the sensitivity is too low, they will "lose" the seabed and record only events above it, such as fish banks .
3 Twist the "Suppressor" knob clockwise to reduce the false echoes that appear on the screen. False echoes appear as the result of prop washing or a wake, or because a signal from the transducer strikes an object at an angle, either dissipating part of the signal or amplifying the signal from another object. Turn the knob to the right slightly until the signal disappears, then return to its original position. If the object returns, it is not a "return false".
4 View the depth of disc-recording when you move past the probe scale. If the probe is calibrated to a maximum depth of 1000 feet and the scanning disc moves toward "0", turn off the unit until the disc stops moving. Turn the unit on and watch the scan to see if a complete revolution is completed with a smooth curve on the recording disc. To get the true depth, add the depth at which the recording disc stops at the maximum calibrated depth.
5 Turn the ring around the "On / Off - Sensitivity" knob to set a maximum depth alarm. When the bottom or other objects enter the area below the boat that is less than depth, an alarm sounds to warn that the boat is standing in danger - approaching shallow water or water containing an obstruction.
6 Interpret the background signal, if necessary. A hard bottom, such as compacted sand, gravel or hard clay will return a wide, bright signal. Scattered rocks will appear as "bumps" on the track recorded by the depth probe and a very wide of signals on the face of the probe. The steep slopes are broad signals that grow wider as they ascend to the surface. Remains on the bottom may look a lot to the rocks, or may have the outline of a glass.
Tips & Warnings
The paper disk is used to record the depth probes data that is both depth- and time-sensitive. Change the discs before the disc has completed a complete revolution, usually once every hour.
